Using setTimeout to delay hover actions in JavaScript
Published: 2 February 2021 • Tags: javascript
For many years I’ve been using jquery-hoverIntent for dropdown menus on my websites. It’s great for improving the user experience (UX) - standard dropdown menus using CSS appear immediately on mouseover, which can be annoying if the user wasn’t aiming for the menu.
Today I will show a simple method to replicate the hoverIntent plugin using the setTimeout function. In the next article I’ll dive into a full replication of the plugin in vanilla JavaScript.
Some of the UX issues with pure CSS hover menus include:
- They appear immediately on hover - which sounds exactly like what you’d want, but they can get in the way if the user was not trying to open the menu, but instead moving past it to click a link or close the browser tab.
- The dropdown itself disappears if the user accidentally moves a single pixel outside the drop-down. It’s very easy to overshoot these things!
- They suffer from something called the “Diagonal Problem” - where moving across to a sub-menu the mouse leaves the current element and thus the whole dropdown immediately disappears.
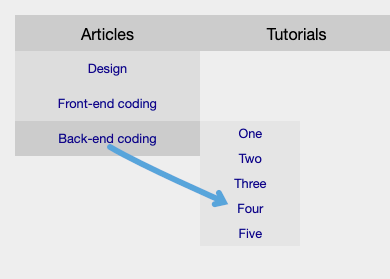
The Diagonal Problem: moving the mouse in this way closes the dropdown
First, here’s a quick demo of what we’ll be creating. The top menu uses pure CSS, the bottom one has a brief delay before opening:
The HTML/CSS setup #
In this tutorial we’ll start with the standard menu and progressively enhance it. The HTML looks like this:
<ul id="nav" class="menu">
	<li class="menu-item">Articles
		<ul class="submenu">
			<li>Design</li>
			<li>Front-end coding</li>
			<li>Back-end coding</li>
		</ul>
	</li>
	<li class="menu-item">Tutorials
		<ul class="submenu">
			<li>HTML</li>
			<li>CSS</li>
			<li>Javascript</li>
		</ul>
	</li>
	<li class="menu-item">...</li>
	<li class="menu-item">...</li>
	<li class="menu-item">...</li>
</ul>
In our CSS we evenly space the top-level menu items using Flexbox, and add some basic colours/padding.
.menu {
	display: flex;
	max-width: 800px;
	list-style: none;
	margin: 1rem auto;
	padding: 0;
	height: 36px;
	background: #ccc;
}
.menu-item {
	flex-grow: 1;
	position: relative;
	padding: 10px;
	text-align: center;
}
.submenu {
	display: none;
	list-style: none;
	position: absolute;
	top: 36px;
	left: 0;
	margin: 0;
	padding: 0;
	width: 100%;
	background: #ddd;
}
.submenu > li {
	padding: 10px;
}
For a pure CSS menu, we would usually add the following code, which ensures that when the menu item is hovered, the submenu changes from display: none to display: block.
.menu-item:hover > .submenu {
	display: block;
}
However, in our case we will use a class instead; shortly we will toggle it with JavaScript:
.menu-item.active > .submenu {
	display: block;
}
If you need to support users without JS enabled, you can put the pure CSS version in a ‘noscript’ tag, like so:
<noscript>.menu-item:hover > .submenu { display: block; }</noscript>Using setTimeout #
Our aim is to only open the menu after a short delay, so that it doesn’t trigger when the user moves their mouse over and out of the menu quickly. We do this using the JavaScript function setTimeout. It takes two parameters: a callback function and a time in milliseconds (one second = 1000 milliseconds). The callback function is called after the time has elapsed. Here’s an example:
setTimeout(function() {
	console.log('Hello world!');
}, 1000);
The above code will log the phrase “Hello world!” to the browser’s developer console after one second. (You can view the console by opening Developer Tools through the browser menu or with Ctrl+Shift+I / Cmd+Opt+I and clicking the Console tab.)
The setTimeout function also returns a unique ID for that timer. If we store this value in a variable we can also stop the callback function from executing by calling clearTimeout:
let timer = setTimeout(function() {
	console.log('Hello world!');
}, 1000);
// cancel it immediately so it will never run
clearTimeout(timer);
So this means for our hover menu, we can start a timer when the mouse enters the menu, which will add the active class when it fires and show the dropdown. Then we can cancel that timeout if the mouse leaves the menu before the timeout executes.
Creating our menu #
Let’s walk through the code. First we set up some variables:
let showDelay = 300, hideDelay = 800;
let menuEnterTimer, menuLeaveTimer;
let allMenuItems = document.querySelectorAll('#nav .menu-item');
We will have a slightly longer timeout if the user moves their mouse away from the dropdown, which also requires two timer functions - one for entering and one for leaving. Then we fetch all the elements with the menu-item class inside our menu with the nav ID.
Next we loop through all the top-level menu elements and add event listeners for mouseenter and mouseleave:
for (let i = 0; i < allMenuItems.length; i++) {
	allMenuItems[i].addEventListener('mouseenter', function() {
		let thisItem = this;
		//...
	});

	allMenuItems[i].addEventListener('mouseleave', function() {
		let thisItem = this;
		//...
	});
}
In each of these functions, we set a timer for that action, and clear the current timer for the opposite action. In other words, when entering the menu we clear the exit timer, and when the mouse leaves the menu we clear the entry timer. Here’s the mouseleave event first:
let thisItem = this;
clearTimeout(menuEnterTimer);
menuLeaveTimer = setTimeout(function() {
	thisItem.classList.remove('active');
}, hideDelay);
Note we use the longer hideDelay there. For the mouseenter event we also need to close all open dropdowns, for the case where the mouse moves from one menu item to the neighbouring menu item.
let thisItem = this;
clearTimeout(menuLeaveTimer);
// hide any active dropdowns
for (let j = 0; j < allMenuItems.length; j++) {
	allMenuItems[j].classList.remove('active');
}
menuEnterTimer = setTimeout(function() {
	thisItem.classList.add('active');
}, showDelay);
The full code #
Here is all our code, with some extra comments. I’ve wrapped the whole thing in a function and call it on the DOMContentLoaded event, which is the equivalent of jQuery’s ‘ready’ event, e.g. $(...). So this can be put in a JS file and referenced anywhere on the page, or alternatively inside script tags.
function menuSetup() {
	// delays in milliseconds
	let showDelay = 300, hideDelay = 800;
	// holding variables for timers
	let menuEnterTimer, menuLeaveTimer;
	// get the top-level menu items
	let allMenuItems = document.querySelectorAll('#nav .menu-item');

	for (let i = 0; i < allMenuItems.length; i++) {
		// triggered when user's mouse enters the menu item
		allMenuItems[i].addEventListener('mouseenter', function() {
			let thisItem = this;
			// clear the opposite timer
			clearTimeout(menuLeaveTimer);
			// hide any active dropdowns
			for (let j = 0; j < allMenuItems.length; j++) {
				allMenuItems[j].classList.remove('active');
			}
			// add active class after a delay
			menuEnterTimer = setTimeout(function() {
				thisItem.classList.add('active');
			}, showDelay);
		});

		// triggered when user's mouse leaves the menu item
		allMenuItems[i].addEventListener('mouseleave', function() {
			let thisItem = this;
			// clear the opposite timer
			clearTimeout(menuEnterTimer);
			// remove active class after a delay
			menuLeaveTimer = setTimeout(function() {
				thisItem.classList.remove('active');
			}, hideDelay);
		});
	}
}

document.addEventListener('DOMContentLoaded', menuSetup);Conclusion #
There we go, a great way to improve the user experience for dropdown menus, in less than 25 lines of JavaScript! Of course, this only applies to desktop computers with a mouse - for mobile devices we need to use one of the touch events such as touchend to open each menu item.
While this does a good job of replicating hoverIntent, there is one flaw in my view - it still expands the menu if the user takes longer to move across it. If you had a large element then it could still trigger when the user wasn’t expecting it. In the next article, I will create a full replica of jquery-hoverIntent which only shows the menu when the mouse movement has slowed down enough.